

How To Print Image On Several Sheets Of Paper In Photoshop
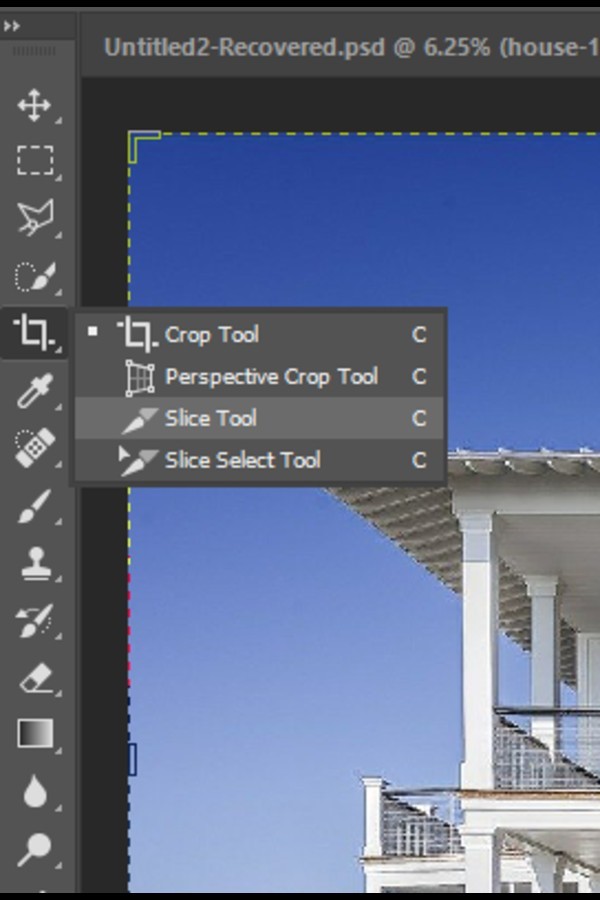
Every bit an Amazon Associate we earn from qualifying purchases. While creating a large-sized affiche or imprint, printing an prototype on a single page may not be enough. You need a solution to carve up the image and print it on multiple pages. Knowing how to print a large image on multiple pages in Photoshop is the best style to retain the image quality with a large size. Quick Navigation Adobe Photoshop allows us to cut and paste portions of images into different files. The newer versions of Photoshop CC are equipped with the Piece tool that does the job perfectly. But there is a manner to do the same part in earlier versions as well, which we volition explain. If y'all are using a regular printer, it is not possible to get a large poster-size impress. Splitting the image is essential, which you can later assemble to class the poster. Doing and so in Photoshop is very easy, but y'all need to take care of a few things to ensure a good quality final printed image. In the offset method, we volition use the piece tool to divide our epitome into multiple sections earlier printing it. Firstly, determine the image size that needs to exist printed. Depending upon the paper size, you volition have to decide the number of sections you will divide your prototype into. A simple way to do this is to separate the epitome size by the maximum size your printer can print. This volition give you the number of sections that y'all need. Choose a printer with a wide format for amend results. Open your prototype file in Adobe Photoshop CC. In the toolbar, right-click on the Crop tool and select the Slice tool. If y'all had selected the Slice tool earlier for an image, it would be shown in the toolbar instead of the Crop tool. Correct-click on the epitome and click on Split Slice. Photoshop creates a folder with the images that you have sliced. Open up it and print them every bit usual. Once printed, you tin assemble the images like a puzzle and mount them to create a large imprint or poster. Suppose you are using an earlier version of Photoshop where the slice tool is not available. In that case, you tin can use the following method to print a big image on multiple pages using Photoshop. The difference between both methods is that the slice tool does the task quicker, and y'all don't need to worry virtually the correct sizing of the sections. Moreover, in this method, you lot demand to manually copy and paste selections into individual images, unlike the split piece tool, which automatically creates and saves image sections into your computer. The ease of the advanced tool gives us another reason to update the software to the latest version. Open the prototype in Adobe Photoshop. Assess the maximum impress dimensions of your printer. Printing a big epitome means you need to know the largest size your printer is able to print. Equally a outcome, you will get an idea about the number of pages yous volition require for printing this item image. Once you know the exact size for each department and the number of sections, divide the image into the required number of sections. Yous can apply the Rectangular Marquee tool for making the selections. Choose the tool from the toolbar, and draw out a choice corresponding to the size of the individual department. Print all the segments (now individual images) i by 1. It is highly recommended to use sleeky newspaper for printing if you lot want professional-quality prints. Put together the individual printed pages to grade the complete big image. Yous tin can cutting abroad the white margins or use them to overlap the adjacent segment when yous piece them together. Using Photoshop to print a big paradigm involves easy steps which ensure improve quality and precise segments which y'all tin put together. The procedure depends upon your printer as well as the version of Photoshop y'all utilise. Nosotros have stated the methods for printing a large paradigm in the new and older version of Adobe Photoshop for your convenience.
How to Print a Large Epitome on Multiple Pages in Photoshop
Method 1: Using the Piece Tool
Determine Epitome Size Co-ordinate to Maximum Printable Size
Open Image
Apply the Dissever Piece Tool
Choose The Settings In The Divide Piece Tool Dialog Box

Relieve The Image
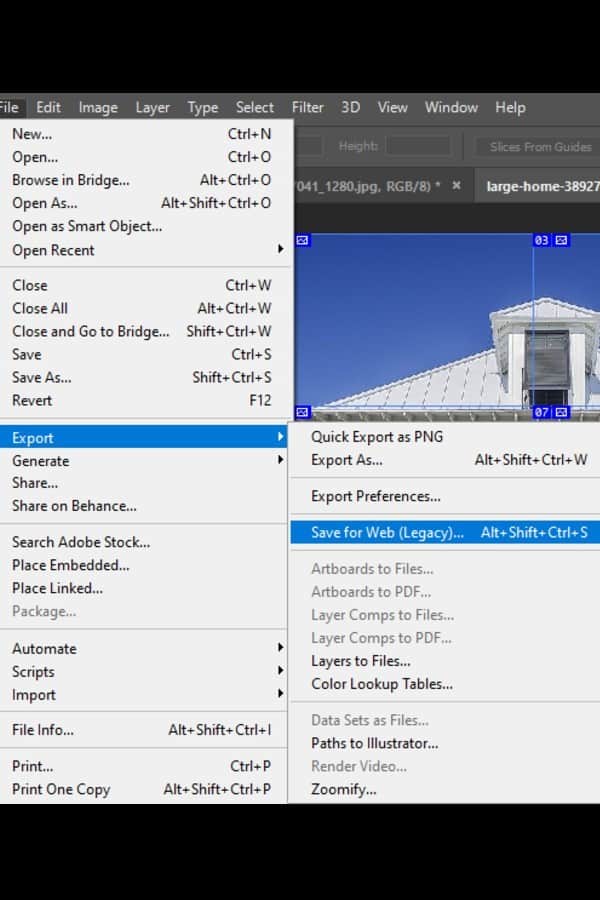

Print The Images
Method ii: Manually Copying Selections
Open up the Image
Determine Maximum Printable Size and the Size of the Printed Epitome
Divide Image into Sections Using Marquee Tool
Copy Sections into New Files as Carve up Images
Determine Print Resolution and Orientation
Print the Files Individually
Piece Together All the Pages to Class the Epitome
Conclusion
Source: https://photographyforrealestate.net/how-to-print-large-image-on-multiple-pages-photoshop/
Posted by: carrollcieved.blogspot.com
0 Response to "How To Print Image On Several Sheets Of Paper In Photoshop"
Post a Comment